Teaching A Robot To Walk - Part One

Following on from my recent post discussing examples of walking robots, it became clear that a logical next step would be to look at how we can teach a robot to walk using simulators and reinforcement learning.
Let’s take a look at these concepts and how they can be applied to the Modular Biped project.
What is a simulator?
A simulator is a piece of software that allows us to create a virtual environment that we can use to test our robot. This is useful for a number of reasons:
- We can test our robot without having to build it
- We can test our robot without having to worry about breaking it
- We can test our robot in a variety of environments
- We can test our robot in a variety of scenarios
- We can run thousands of tests in a short period of time
This last point is particularly important when we are using reinforcement learning. We need to be able to run many tests in order to train our robot to walk. This would be very difficult to do in the real world, but in a simulator we can do this as long as we have the processing resources available.
What is reinforcement learning?
Reinforcement learning is a type of machine learning that uses a reward system to train a model. The model is given a goal and then rewarded for achieving that goal. The model is then able to learn how to achieve the goal by trying different actions and observing the results.
In the case of a walking robot, the goal would be to move from one location to another. The model would be rewarded for moving towards the goal and penalised for moving away from the goal. This would allow the model to learn how to move towards the goal.
It is also possible to reward or penalise the model for other actions, such as using too much energy to walk, or changes in direction of servos. This allows us to train the model to walk in a way that is efficient and smooth.
How can we use these concepts in the Modular Biped project?
The Modular Biped project is a great candidate for this type of learning as it is a complex task that is difficult to program manually. It is also a task that is difficult to test in the real world as it requires a lot of time and resources to build and test.
The current structure of the robot does not allow for lateral hip actuation (although there are joints in the hips) and so we will need to add this functionality in order to allow the robot to walk. Rather than building the hardware to test, we can assemble it virtually in a simulator and then test it in a virtual environment. This allows us to iterate the design much more quickly than in the real world.
How do we create a simulator?
Fortunately for us, there are a number of simulators already available, either free or for a fee. These include:
Because I have no idea what I’m doing, and because I have a guide for Mujoco, I will be using that as an example. However, the concepts are similar for all of the simulators listed above.
What is Mujoco?
Mujoco is a physics engine that allows us to create a virtual environment and simulate the physics of that environment. We can use it to define the structure of our robot and the properties of the materials that it is made from. We can also define the properties of the environment, such as gravity and friction.
Let’s get started
For this quick example I’ll be using the repository from GitHub user @sergiynesterenko90
It utilises Google Colaboratory (colab) workspaces to run the simulations. This is a great way to get started as it allows us to run the simulations without having to install anything locally. It also allows us to use the free GPU resources provided by Google to speed up the training process.
Step 1 - Create a Google Colab workspace
Open the URL above and navigate to the notebooks folder, then open the brax.ipynb notebook.
At the top of this notebook you will see a button that says ‘Open in Colab’. Click this button to open the notebook in a new tab.
Step 2 - Run the notebook
You will see a list of steps in the notebook. These are the steps that we will follow to train our robot to walk. Each must be executed sequentially in order to train the robot.
- Import dependencies
- Load environment
- Training
- Saving and Loading policies
- Visualizing a trajectory of the learned inference function
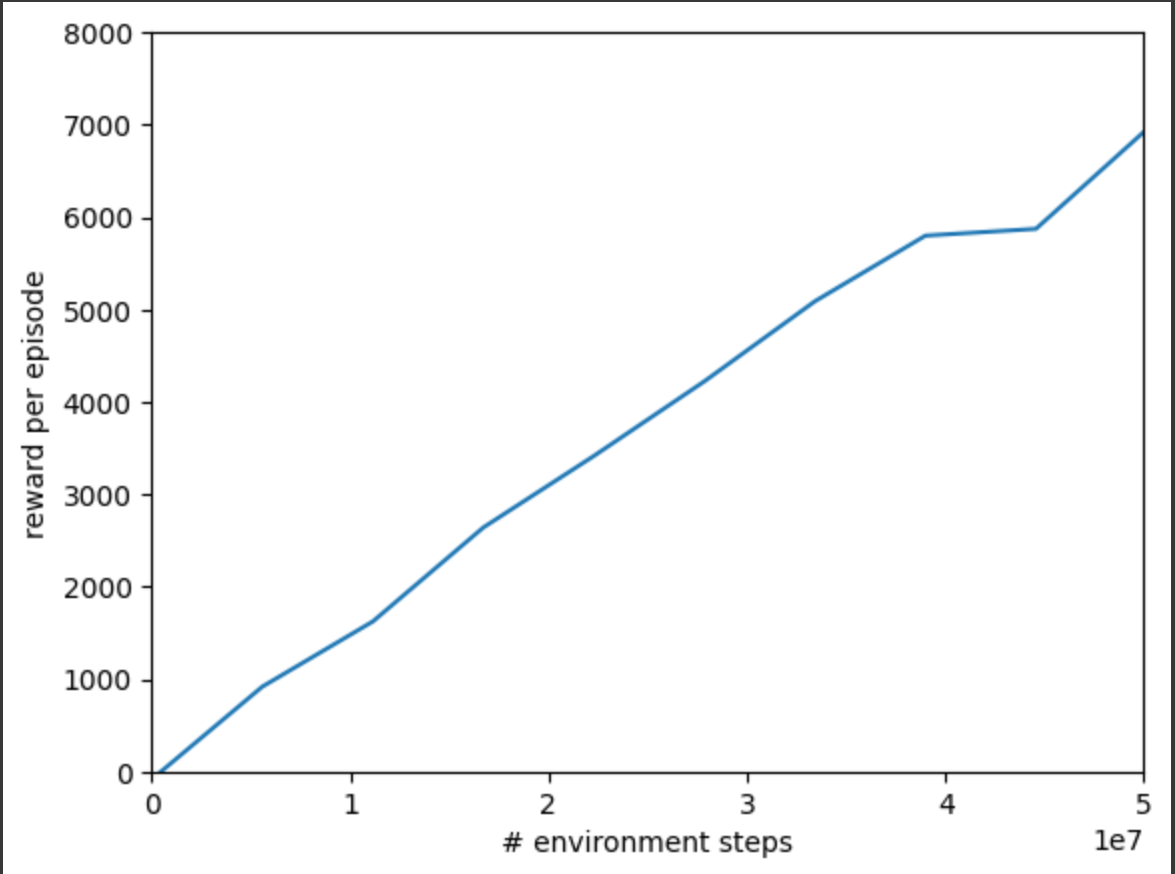
When training the model you should see a chart detailing the reward per episode and number of environment steps. This shows the progress of the training process.
After visualising the trajectory you should see the outcome of the reinforcement learning process. This is the robot learning how to walk.
Learn More
The YouTube video below shows the process in a lot more detail, explaining the use of all the notebooks detailed in this repository. It’s a long watch but worth it for the additional information and context.
What now?
This is a great first step, but to continue development on your own you will need to model your own robot. This is where the Mujoco documentation comes in handy. You can find it here:
In the next part of this series I will be using this documentation to create a model of the Modular Biped robot and then (hopefully) train it to walk. If you’d like to help out please get in touch on the community