Maker Websites with GitHub Pages | Free Hosting
As a maker that loves to show my projects to the world, one of the challenges I have always faced is understanding the best platform to do that.
Many years ago I worked in web development. It was, by comparison, much less accessible. I’m pleased to say that things have improved, now affordable and maintainable hosting solutions are everywhere.
Enter GitHub Pages.
What is GitHub Pages?
Not a fan of guides? Check out the TL;DR at the end.
GitHub Pages is a free service that allows you to host a static website for free. It’s a great way to get started with a website and to get your projects out there. And best of all, you don’t need to know anything about web development to get started.
GitHub Pages allows you to create static pages using Markdown, a simple markup language that is easy to learn. You can also use HTML if you prefer. GitHub Pages also supports Jekyll, a static site generator that allows you to create dynamic websites using Markdown and Liquid templates. Don’t worry if you don’t know these terms yet. We’ll get there!
What about custom domains?
By default you’d access your website from the URL username.github.io, but GitHub Pages also allows you to use a custom domain name. This means that you can have a website with your own domain name, like mydomainname.com. This is a great way to make your website look more professional and to make it easier for people to find you.
If you’d like to explore this option now, you can find more information here.
How do I get started?
You’ll need to familiarise yourself with a few things to get this working. Don’t worry, it’s not as complicated as it sounds. I’ll walk you through the process step by step.
Take your time if you’re not familiar with these concepts. Understanding each step is important and will help you feel more confident in working with these tools.
If you’re not familiar with using the command line (or terminal), you might want to take a look at a basic tutorial. That said, there is an app called GitHub Desktop that allows you to do most of this without using the command line, but I won’t be covering that here. I’ll leave it up to you to decide which you prefer.
Install Jekyll
Jekyll is a static site generator that allows you to create dynamic websites using Markdown and Liquid templates. It’s a great way to get started with a website and to get your projects out there. And best of all, you don’t need to know anything about web development to get started.
Create a GitHub account
The first thing you need to do is create a GitHub account. If you don’t already have one, you can sign up for free at GitHub.com.
Next you’ll need to set up git on your computer: Set up git
Create a new repository from a theme
What are repositories?
Once you have an account, you can create a new repository. A repository is simply a location on your GitHub account where you will store your website files. It comes with some really nice features that let you track and manage changes and even let other people contribute.
The naming of your repository must be username.github.io where username is your GitHub username. For example, if my GitHub username is makerforge so my repository name is makerforge.github.io. (Note: You can also set up organisations in github, but that’s a topic for another day.)
Finding a theme
GitHub pages supports a number of themes. These are pre-existing layouts that allow you to create a website without having to worry about the design. You can find a list of themes here. You can also create your own theme if you want to. As an example, this website uses the Chirpy theme. It comes with example pages and even the source code for the theme itself.
If you want to use a theme, there are often starter repos that you can copy (fork) to your own account. This is a great way to get started quickly. If you’d like to use a theme, fork the repo and name it username.github.io where username is your GitHub username. You can then edit the files to customise your website.
Create your website
Now you have a repository, you can start creating your website. You can do this in a number of ways. You can create a website using HTML, Markdown, or Jekyll. If you’re not sure which one to use, I’d recommend starting with Markdown. It’s easy to learn and you can always switch to HTML or Jekyll later if you want to.
Get a local copy of your repository
At the moment your repository and all the files are stored on GitHub’s servers. You can edit them online directly, but I’d recommend getting a local copy of your repository. This will allow you to edit your files on your computer and then upload them to GitHub when you’re ready.
How to Clone a repository locally
Start making changes
Now you have a local copy of your repository, you can start making changes. If you’re using Markdown, you can edit your files using any text editor. If you’re using HTML, you can use any HTML editor. If you’re using Jekyll, you can use any text editor or IDE that supports Jekyll. I’d recommend using Visual Studio Code as it has great support for Markdown and Jekyll.
You will see a list of files and folders (directories). Fortunately You can ignore most of these.
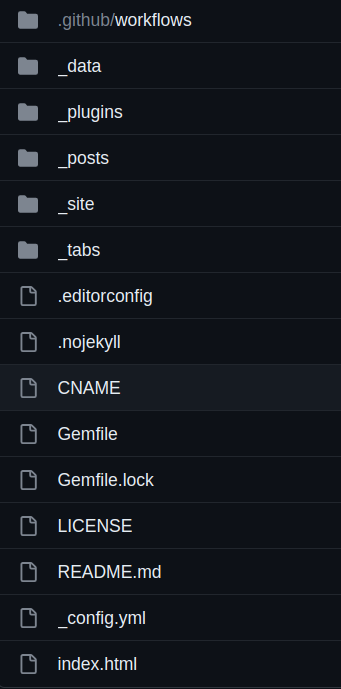
The areas you’re interested in are:
_posts- This is where your blog posts will go. You can create a new file for each post. The file name should be in the formatYYYY-MM-DD-title.mdwhereYYYY-MM-DDis the date of your post andtitleis the title of your post. For example,2023-10-04-github-pages.md. You can use Markdown or HTML for your posts._pages- This is where your pages will go. You can create a new file for each page. The file name should be in the formattitle.mdwheretitleis the title of your page. For example,about.md. You can use Markdown or HTML for your pages._tabs- This is where your tabs will go. You can create a new file for each tab. The file name should be in the formattitle.mdwheretitleis the title of your tab. For example,about.md. You can use Markdown or HTML for your tabs._config.yml- This is where you can configure your website. You can change the title, description, and other settings here. You can also change the theme here.assets- This is where you can store images and other files that you want to use on your website. You can create subfolders to organise your files.
The home page in the theme above is a list of the posts, so you’ll need to create at least one post to see anything on your website.
Commit your changes
Try this out by creating a post, once you’ve done that, you can commit your changes. This will save your changes to your local repository. You can then push your changes to GitHub. This will upload your changes to GitHub and make them available on your website.
How to Commit and Push changes
View your website
You can build your website locally by running bundle exec jekyll serve from the command line. This will build your website and make it available at http://localhost:4000. You can then view your website in your browser at that address.
You should see the changes you have made. If you don’t, check the output from the command line to see if there are any errors.
Installing Google Analytics and Adsense
If you’re like me and want to know whether people are actually viewing your content, you can use Google Analytics to track visits to your site easily. Simply sign up for an account and then add the tracking identifier (G-XXXXXXXX) to the _config.yml file in your repository (next to id: under google_analytics:).
For google adsense, it’s a little more complicated:
- Create an adsense account, add your site and copy the code required (It should look something like this
<script data-ad-client="ca-pub-XXXXX" async src="https://pagead2.googlesyndication.com/pagead/js/adsbygoogle.js"></script>). - Customise your adsense configuration to allow ‘auto ads’. This will place ads on your site automatically where they are most likely to be seen.
- Create a folder
_includesin your repository, then create an empty filehead.html. If this already exists you can skip the next step. - Navigate to the theme repo and copy the content of the file
head.htmlinto your new file (example) - In that file, before the line that reads
</head>add the code copied from Google Adsense.
What next?
Now you have a website, you can start adding content. You can create new posts, pages, and tabs. You can also customise the theme and add your own images and files. To deploy the latest changes simply commit and push your changes to GitHub. The in-built github action will take care of the rest.
Conclusion
This is a very basic introduction to GitHub Pages. There is a lot more you can do with it, but hopefully this will get you started. If you have any questions, please feel free to ask in the community. I’d also love to see what you create, so please share your website with us!
If you’d like to see a video explaining this process, take a look at this video by Techno Tim.
TD;LR?
Just want to get on with it? Assuming you have jekyll, git and github already configured, you can fork the repo then use these terminal commands to get your own website up and running in your own github pages repository.
Sign in to GitHub and browse to Chirpy Starter, click the button Use this template > Create a new repository, and name the new repository username.github.io, where username represents your GitHub username.
On your local computer:
1
2
3
4
5
6
7
8
9
10
11
12
13
# Clone the theme repository
git clone <your new repository url>

# Change directory to your repository
cd <your new repository>

# Install the dependencies
bundle

# Run local server
bundle exec jekyll serve

# Navigate to http://localhost:4000 in your web browser